注意
点击此处下载完整的示例代码
准备用于对象检测的自定义数据集
GluonCV 已经为常用的公共数据集提供了内置支持,无需任何额外工作,例如 准备 PASCAL VOC 数据集 和 准备 COCO 数据集。
然而,为对象检测任务创建你自己的自定义数据集是很常见且自然的。
本教程旨在为你提供一些提示,扫清障碍。实践中,请随意选择最适合你用例的方法。
1. GluonCV 和 MXNet 首选的对象检测格式
让我们回顾一些基础背景知识,以防你不熟悉它们。
边界框 (Bounding Boxes)
有多种方式来组织对象检测任务的标签格式。我们将简要介绍最常用的方式:边界框。
GluonCV 要求所有边界框都编码为 (xmin, ymin, xmax, ymax),也就是每个感兴趣对象的 (左, 顶, 右, 底) 边界。
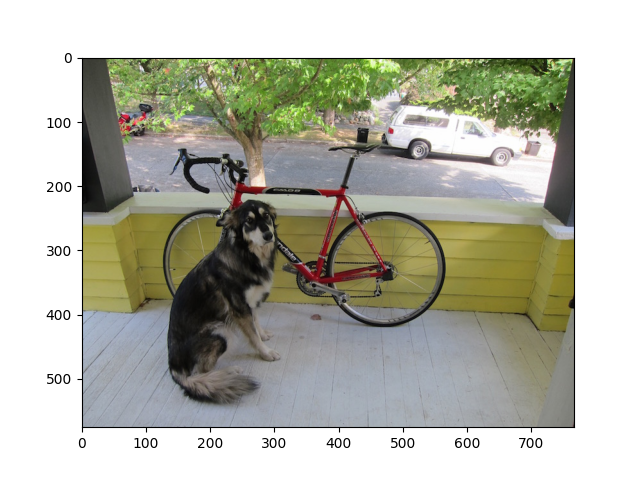
首先,我们绘制一个真实图像作为示例
import os, zipfile
from gluoncv import utils
import mxnet as mx
import numpy as np
from matplotlib import pyplot as plt

im_fname = utils.download('https://github.com/dmlc/web-data/blob/master/' +
                          'gluoncv/datasets/dog.jpg?raw=true',
                          path='dog.jpg')
img = mx.image.imread(im_fname)
ax = utils.viz.plot_image(img)
print(img.shape)
plt.show()
输出
Downloading dog.jpg from https://github.com/dmlc/web-data/blob/master/gluoncv/datasets/dog.jpg?raw=true...

  0%|          | 0/160 [00:00<?, ?KB/s]
100%|##########| 160/160 [00:00<00:00, 51817.52KB/s]
(576, 768, 3)
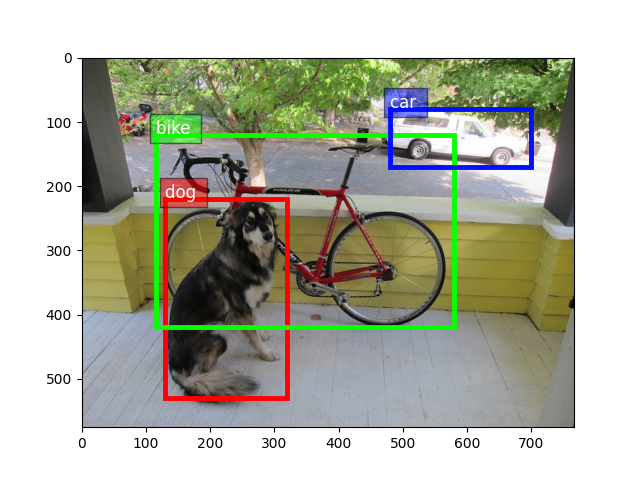
现在,让我们手动为图像标注标签以作演示。
提示
实践中,使用专用的 GUI 标注工具会更方便。
我们要求所有边界框都遵循这个格式:(xmin, ymin, xmax, ymax)
dog_label = [130, 220, 320, 530]
bike_label = [115, 120, 580, 420]
car_label = [480, 80, 700, 170]
all_boxes = np.array([dog_label, bike_label, car_label])
all_ids = np.array([0, 1, 2])
class_names = ['dog', 'bike', 'car']

# see how it looks by rendering the boxes into image
ax = utils.viz.plot_bbox(img, all_boxes, labels=all_ids, class_names=class_names)
plt.show()
GluonCV 和 MXNet 的 LST 标签
遵循 MXNet 中使用的约定,我们推荐使用 LST 文件来存储标签,它是一个纯文本列表文件。
LST 文件最初是在 MXNet 中引入的,遵循 RecordIO 设计 以及 创建 LST 文件的列表文件教程。
提示
使用单个 LST 文件的好处有两方面
管理一个单一文件比管理散乱的标注文件更容易。
它与
RecordFile二进制格式兼容,我们稍后将在本教程中介绍。
LST 文件的格式是
"""
integer_image_index \t label_of_variable_length \t relative_path_to_image
"""
通常,我们获取所有图像的文件名列表,打乱它们,然后将它们分成两个列表:一个训练文件名列表和一个测试文件名列表。
这里我们使用与 mxnet.image.ImageDetIter 兼容的对象检测任务格式。
mxnet.image.ImageDetIter 是一个用 C++ 编写的对象检测数据迭代器,包含大量的数据增强选项。然而,它不够灵活,无法处理所有类型的定制数据增强。因此,在 GluonCV 中,我们切换到了 gluoncv.data.transforms 来支持几乎所有类型的数据增强。
更具体地说,对象检测任务的标签描述如下


因此,我们刚刚标注的图像对应的 LST 文件可以格式化为
def write_line(img_path, im_shape, boxes, ids, idx):
    h, w, c = im_shape
    # for header, we use minimal length 2, plus width and height
    # with A: 4, B: 5, C: width, D: height
    A = 4
    B = 5
    C = w
    D = h
    # concat id and bboxes
    labels = np.hstack((ids.reshape(-1, 1), boxes)).astype('float')
    # normalized bboxes (recommanded)
    labels[:, (1, 3)] /= float(w)
    labels[:, (2, 4)] /= float(h)
    # flatten
    labels = labels.flatten().tolist()
    str_idx = [str(idx)]
    str_header = [str(x) for x in [A, B, C, D]]
    str_labels = [str(x) for x in labels]
    str_path = [img_path]
    line = '\t'.join(str_idx + str_header + str_labels + str_path) + '\n'
    return line
单行可能很长,但包含对象检测所需的每张图像的完整信息。
每行的长度不同,取决于对应图像中标注了多少对象。
通过逐行堆叠,很自然地可以创建用于训练/验证目的的 train.lst 和 val.lst 文件。
在本教程中,我们重复相同的图像 4 次,创建一个伪造的 val.lst 文件。
输出
0       4       5       768     576     0.0     0.16927083333333334     0.3819444444444444      0.4166666666666667      0.9201388888888888      1.0     0.14973958333333334     0.20833333333333334     0.7552083333333334      0.7291666666666666      2.0     0.625   0.1388888888888889      0.9114583333333334      0.2951388888888889      dog.jpg

1       4       5       768     576     0.0     0.16927083333333334     0.3819444444444444      0.4166666666666667      0.9201388888888888      1.0     0.14973958333333334     0.20833333333333334     0.7552083333333334      0.7291666666666666      2.0     0.625   0.1388888888888889      0.9114583333333334      0.2951388888888889      dog.jpg

2       4       5       768     576     0.0     0.16927083333333334     0.3819444444444444      0.4166666666666667      0.9201388888888888      1.0     0.14973958333333334     0.20833333333333334     0.7552083333333334      0.7291666666666666      2.0     0.625   0.1388888888888889      0.9114583333333334      0.2951388888888889      dog.jpg

3       4       5       768     576     0.0     0.16927083333333334     0.3819444444444444      0.4166666666666667      0.9201388888888888      1.0     0.14973958333333334     0.20833333333333334     0.7552083333333334      0.7291666666666666      2.0     0.625   0.1388888888888889      0.9114583333333334      0.2951388888888889      dog.jpg
用于加载文件夹中原始图像的 LstDetection
假设图像文件夹的相对根路径是当前目录
from gluoncv.data import LstDetection
lst_dataset = LstDetection('val.lst', root=os.path.expanduser('.'))
print('length:', len(lst_dataset))
first_img = lst_dataset[0][0]
print('image shape:', first_img.shape)
print('Label example:')
print(lst_dataset[0][1])
print("GluonCV swaps bounding boxes to columns 0-3 by default")
输出
length: 4
image shape: (576, 768, 3)
Label example:
[[130. 220. 320. 530.   0.]
 [115. 120. 580. 420.   1.]
 [480.  80. 700. 170.   2.]]
GluonCV swaps bounding boxes to columns 0-3 by default
用于加载打包在单个 MXNet RecordFile 中的整个数据集的 RecordFileDetection
读取文件夹中散乱的图像可能很慢,这是由于磁盘随机访问速度的限制。随机/顺序访问速度之间存在显著差距,尤其是在机械硬盘上。即使是基于现代 PCI-E 的固态硬盘,顺序读取的 IO 性能仍然远超随机读取。
我们将跳过重复介绍 MXNet 内置的 RecordIO 设计,如果你感兴趣,可以查看 RecordIO 设计。
在本节中,我们将介绍创建 Record 文件的一些基本步骤。
首先,你需要一个 im2rec.py 文件才能开始。
提示
你可以在 incubator-mxnet/tools/ 中找到 im2rec.py,或者你可以直接现在下载它。
用法
python im2rec.py lst_file_name relative_root_to_images --pass-through --pack-label
im2rec.py 的一些重要参数
--pass-through:不转码原始图像,按原样打包为二进制。无论如何,它将保留原始质量和纵横比。
--pack-label:将 lst 文件中的标签打包到二进制记录文件中,这样.rec文件就是自完整的。
import sys
import subprocess
im2rec = utils.download('https://raw.githubusercontent.com/apache/incubator-mxnet/' +
                        '6843914f642c8343aaa9a09db803b6af6f5d94a2/tools/im2rec.py', 'im2rec.py')
# In this tutorial we skip generating in subprocess but instead download a prepared val.rec
# subprocess.check_output([sys.executable, 'im2rec.py', 'val', '.', '--no-shuffle', '--pass-through', '--pack-label'])
utils.download('https://gist.github.com/zhreshold/599999eab290e951fcfb26cdd59885e2/raw/0d945eeea2a71ba7bd3e39d463f39921acb786d1/val.rec', 'val.rec')
utils.download('https://gist.github.com/zhreshold/599999eab290e951fcfb26cdd59885e2/raw/0d945eeea2a71ba7bd3e39d463f39921acb786d1/val.idx', 'val.idx')
输出
Downloading im2rec.py from https://raw.githubusercontent.com/apache/incubator-mxnet/6843914f642c8343aaa9a09db803b6af6f5d94a2/tools/im2rec.py...

  0%|          | 0/4 [00:00<?, ?KB/s]
100%|##########| 4/4 [00:00<00:00, 3139.45KB/s]
Downloading val.rec from https://gist.github.com/zhreshold/599999eab290e951fcfb26cdd59885e2/raw/0d945eeea2a71ba7bd3e39d463f39921acb786d1/val.rec...

  0%|          | 0/640 [00:00<?, ?KB/s]
641KB [00:00, 63748.97KB/s]
Downloading val.idx from https://gist.github.com/zhreshold/599999eab290e951fcfb26cdd59885e2/raw/0d945eeea2a71ba7bd3e39d463f39921acb786d1/val.idx...

0KB [00:00, ?KB/s]
1KB [00:00, 1634.57KB/s]
现在类似地,我们可以用一行代码从刚刚创建的二进制文件创建数据集
from gluoncv.data import RecordFileDetection
record_dataset = RecordFileDetection('val.rec', coord_normalized=True)

# we expect same results from LstDetection
print('length:', len(record_dataset))
first_img = record_dataset[0][0]
print('image shape:', first_img.shape)
print('Label example:')
print(record_dataset[0][1])
输出
length: 4
image shape: (576, 768, 3)
Label example:
[[130. 220. 320. 530.   0.]
 [115. 120. 580. 420.   1.]
 [480.  80. 700. 170.   2.]]
2. 从 PASCAL VOC 格式派生
如果你有一个完全符合 Pascal VOC 对象检测格式的自定义数据集,那可能是个好消息,因为它可以很快地适应 GluonCV 格式。
我们提供一个模板供你查看结构
fname = utils.download('https://github.com/dmlc/web-data/blob/master/gluoncv/datasets/VOCtemplate.zip?raw=true', 'VOCtemplate.zip')
with zipfile.ZipFile(fname) as zf:
    zf.extractall('.')
输出
Downloading VOCtemplate.zip from https://github.com/dmlc/web-data/blob/master/gluoncv/datasets/VOCtemplate.zip?raw=true...

  0%|          | 0/79 [00:00<?, ?KB/s]
100%|##########| 79/79 [00:00<00:00, 29813.75KB/s]
VOC 格式的数据集将具有以下结构
"""
VOCtemplate
└── VOC2018
    ├── Annotations
    │   └── 000001.xml
    ├── ImageSets
    │   └── Main
    │       └── train.txt
    └── JPEGImages
        └── 000001.jpg
"""
以及一个标注文件的示例
输出
<annotation>
        <filename>000001.jpg</filename>
        <size>
                <width>353</width>
                <height>500</height>
                <depth>3</depth>
        </size>
        <object>
                <name>dog</name>
                <difficult>0</difficult>
                <bndbox>
                        <xmin>48</xmin>
                        <ymin>240</ymin>
                        <xmax>195</xmax>
                        <ymax>371</ymax>
                </bndbox>
        </object>
        <object>
                <name>person</name>
                <difficult>0</difficult>
                <bndbox>
                        <xmin>8</xmin>
                        <ymin>12</ymin>
                        <xmax>352</xmax>
                        <ymax>498</ymax>
                </bndbox>
        </object>
</annotation>
只要你的数据集能够匹配 PASCAL VOC 约定,从 VOCDetection 派生自定义数据集就很方便。
from gluoncv.data import VOCDetection
class VOCLike(VOCDetection):
    CLASSES = ['person', 'dog']
    def __init__(self, root, splits, transform=None, index_map=None, preload_label=True):
        super(VOCLike, self).__init__(root, splits, transform, index_map, preload_label)

dataset = VOCLike(root='VOCtemplate', splits=((2018, 'train'),))
print('length of dataset:', len(dataset))
print('label example:')
print(dataset[0][1])
输出
length of dataset: 1
label example:
[[ 47. 239. 194. 370.   1.   0.]
 [  7.  11. 351. 497.   0.   0.]]
最后一列表示标注对象的难度。如果它不在你的 xml 文件意图范围内,你可以忽略以下部分。
"""<difficult>0</difficult>"""
脚本总运行时间: ( 0 分钟 1.327 秒)