注意
点击 此处 下载完整的示例代码
02. 使用预训练的 Faster RCNN 模型进行预测
本文展示了如何使用预训练的 Faster RCNN 模型。
首先导入一些必要的库
from matplotlib import pyplot as plt
import gluoncv
from gluoncv import model_zoo, data, utils
加载预训练模型
让我们获取一个在 Pascal VOC 数据集上使用 ResNet-50 主干网络训练的 Faster RCNN 模型。通过指定 pretrained=True,如果需要,它将自动从模型库下载模型。有关更多预训练模型,请参阅 模型库。
返回的模型是一个 HybridBlock gluoncv.model_zoo.FasterRCNN,默认上下文为 cpu(0)。
net = model_zoo.get_model('faster_rcnn_resnet50_v1b_voc', pretrained=True)
输出
Downloading /root/.mxnet/models/faster_rcnn_resnet50_v1b_voc-447328d8.zip from https://apache-mxnet.s3-accelerate.dualstack.amazonaws.com/gluon/models/faster_rcnn_resnet50_v1b_voc-447328d8.zip...

  0%|          | 0/121887 [00:00<?, ?KB/s]
  0%|          | 139/121887 [00:00<01:51, 1089.62KB/s]
  1%|          | 700/121887 [00:00<00:39, 3046.41KB/s]
  2%|2         | 2700/121887 [00:00<00:12, 9767.53KB/s]
  6%|5         | 6773/121887 [00:00<00:05, 20970.39KB/s]
 13%|#2        | 15238/121887 [00:00<00:02, 42664.05KB/s]
 19%|#8        | 22713/121887 [00:00<00:01, 53166.98KB/s]
 26%|##5       | 31179/121887 [00:00<00:01, 63201.52KB/s]
 32%|###1      | 38601/121887 [00:00<00:01, 66646.10KB/s]
 38%|###8      | 46623/121887 [00:00<00:01, 70793.12KB/s]
 45%|####4     | 54549/121887 [00:01<00:00, 73382.50KB/s]
 51%|#####     | 61991/121887 [00:01<00:00, 73695.64KB/s]
 58%|#####7    | 70392/121887 [00:01<00:00, 76818.19KB/s]
 64%|######4   | 78104/121887 [00:01<00:00, 69034.10KB/s]
 70%|######9   | 85176/121887 [00:01<00:00, 53388.30KB/s]
 76%|#######6  | 92922/121887 [00:01<00:00, 59031.93KB/s]
 82%|########2 | 100493/121887 [00:01<00:00, 63215.83KB/s]
 89%|########8 | 108120/121887 [00:01<00:00, 66656.75KB/s]
 95%|#########4| 115184/121887 [00:02<00:00, 66136.97KB/s]
121888KB [00:02, 58292.22KB/s]
图像预处理
接下来,我们下载一张图像,并使用预设的数据转换进行预处理。默认行为是将图像的短边调整为 600px。但你可以输入任意大小的图像。
如果你想一次加载多张图像,可以向 gluoncv.data.transforms.presets.rcnn.load_test() 提供一个图像文件名的列表,例如 [im_fname1, im_fname2, ...]。
这个函数返回两个结果。第一个是形状为 (batch_size, RGB_channels, height, width) 的 NDArray。它可以直接输入到模型中。第二个结果包含 numpy 格式的图像,方便绘制。由于我们只加载了一张图像,x 的第一个维度是 1。
请注意,orig_img 被调整为短边 600px。
im_fname = utils.download('https://github.com/dmlc/web-data/blob/master/' +
                          'gluoncv/detection/biking.jpg?raw=true',
                          path='biking.jpg')
x, orig_img = data.transforms.presets.rcnn.load_test(im_fname)
输出
Downloading biking.jpg from https://github.com/dmlc/web-data/blob/master/gluoncv/detection/biking.jpg?raw=true...

  0%|          | 0/244 [00:00<?, ?KB/s]
100%|##########| 244/244 [00:00<00:00, 56824.55KB/s]
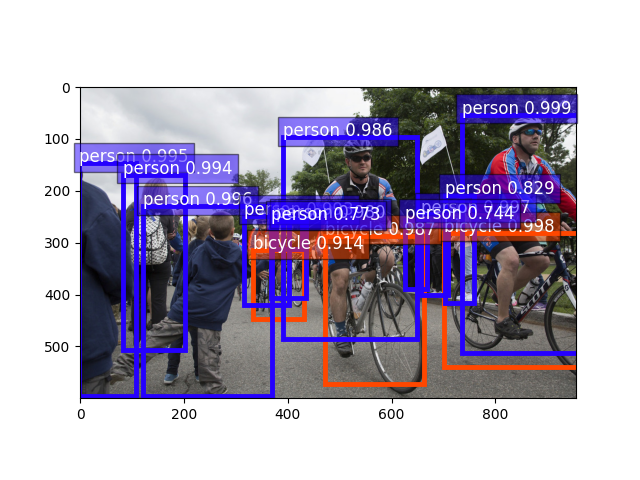
推理与显示
Faster RCNN 模型返回预测的类别 ID、置信度得分和边界框坐标。它们的形状分别为 (batch_size, num_bboxes, 1)、(batch_size, num_bboxes, 1) 和 (batch_size, num_bboxes, 4)。
我们可以使用 gluoncv.utils.viz.plot_bbox() 来可视化结果。我们截取第一张图像的结果并将其输入到 plot_bbox 中。
脚本总运行时间: ( 0 分钟 5.991 秒)