注意
点击此处下载完整的示例代码
02. 使用预训练的 Monodepth2 模型从图像序列或视频中预测深度
本文将演示如何从图像序列或视频流中估计深度。
如果尚未安装 MXNet 和 GluonCV,请按照安装指南进行安装。
首先,导入必要的模块。
import os
import argparse
import time
import PIL.Image as pil
import numpy as np

import mxnet as mx
from mxnet.gluon.data.vision import transforms

import gluoncv
from gluoncv.model_zoo.monodepthv2.layers import disp_to_depth

import matplotlib as mpl
import matplotlib.cm as cm
import cv2

# using cpu
ctx = mx.cpu(0)
准备数据
在本教程中,我们以 KITTI RAW 数据集的一个序列为例。由于 KITTI RAW 数据集只提供图像序列,因此本教程中的输入格式为图像序列。
按照命令下载示例数据
cd ~/.mxnet/datasets/kitti/examples
wget https://s3.eu-central-1.amazonaws.com/avg-kitti/raw_data/2011_09_26_drive_0095/2011_09_26_drive_0095_sync.zip
unzip 2011_09_26_drive_0095_sync.zip
获取数据集后,我们可以使用 PIL 轻松加载图像。
data_path = os.path.expanduser("~/.mxnet/datasets/kitti/example/2011_09_26/2011_09_26_drive_0095_sync/image_02/data")

files = os.listdir(os.path.expanduser(data_path))
files.sort()

raw_img_sequences = []
for file in files:
    file = os.path.join(data_path, file)
    img = pil.open(file).convert('RGB')
    raw_img_sequences.append(img)

original_width, original_height = raw_img_sequences[0].size
加载模型
在本教程中,我们将图像序列中的帧输入到深度估算模型中,然后就可以获得输入帧的深度图。
对于模型,我们使用 monodepth2_resnet18_kitti_mono_stereo_640x192,因为它准确且可以恢复立体基线的比例因子。
输出
Downloading /root/.mxnet/models/monodepth2_resnet18_kitti_mono_stereo_640x192-9515c219.zip from https://apache-mxnet.s3-accelerate.dualstack.amazonaws.com/gluon/models/monodepth2_resnet18_kitti_mono_stereo_640x192-9515c219.zip...

  0%|          | 0/70343 [00:00<?, ?KB/s]
  0%|          | 101/70343 [00:00<01:21, 858.14KB/s]
  1%|          | 515/70343 [00:00<00:28, 2419.21KB/s]
  3%|3         | 2181/70343 [00:00<00:08, 7736.56KB/s]
 12%|#1        | 8202/70343 [00:00<00:02, 26380.50KB/s]
 21%|##1       | 14992/70343 [00:00<00:01, 40358.57KB/s]
 32%|###1      | 22197/70343 [00:00<00:00, 50649.36KB/s]
 44%|####4     | 31151/70343 [00:00<00:00, 62972.78KB/s]
 56%|#####5    | 39274/70343 [00:00<00:00, 68660.36KB/s]
 68%|######7   | 47647/70343 [00:00<00:00, 73301.38KB/s]
 80%|########  | 56595/70343 [00:01<00:00, 78242.36KB/s]
 92%|#########1| 64492/70343 [00:01<00:00, 78066.28KB/s]
70344KB [00:01, 57446.53KB/s]
预测循环
对于每一帧,我们执行以下步骤
从图像序列加载一帧
预处理图像
估计图像的视差
将视差转换为深度图
将深度图存储到预测序列
min_depth = 0.1
max_depth = 100

# while use stereo or mono+stereo model, we could get real depth value
scale_factor = 5.4
MIN_DEPTH = 1e-3
MAX_DEPTH = 80

feed_height = 192
feed_width = 640

pred_depth_sequences = []
pred_disp_sequences = []
for img in raw_img_sequences:
    img = img.resize((feed_width, feed_height), pil.LANCZOS)
    img = transforms.ToTensor()(mx.nd.array(img)).expand_dims(0).as_in_context(context=ctx)

    outputs = model.predict(img)
    mx.nd.waitall()
    pred_disp, _ = disp_to_depth(outputs[("disp", 0)], min_depth, max_depth)
    t = time.time()
    pred_disp = pred_disp.squeeze().as_in_context(mx.cpu()).asnumpy()
    pred_disp = cv2.resize(src=pred_disp, dsize=(original_width, original_height))
    pred_disp_sequences.append(pred_disp)

    pred_depth = 1 / pred_disp
    pred_depth *= scale_factor
    pred_depth[pred_depth < MIN_DEPTH] = MIN_DEPTH
    pred_depth[pred_depth > MAX_DEPTH] = MAX_DEPTH
    pred_depth_sequences.append(pred_depth)
存储结果
这里,我们提供了一个存储预测结果的示例。包括:
存储深度图
output_path = os.path.join(os.path.expanduser("."), "tmp")

pred_path = os.path.join(output_path, 'pred')
if not os.path.exists(pred_path):
    os.makedirs(pred_path)

for pred, file in zip(pred_depth_sequences, files):
    pred_out_file = os.path.join(pred_path, file)
    cv2.imwrite(pred_out_file, pred)
存储视差并将其保存到视频
rgb_path = os.path.join(output_path, 'rgb')
if not os.path.exists(rgb_path):
os.makedirs(rgb_path)
output_sequences = []
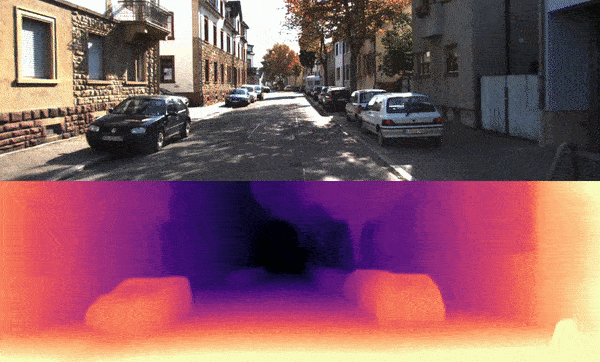
for raw_img, pred, file in zip(raw_img_sequences, pred_disp_sequences, files):
vmax = np.percentile(pred, 95)
normalizer = mpl.colors.Normalize(vmin=pred.min(), vmax=vmax)
mapper = cm.ScalarMappable(norm=normalizer, cmap='magma')
colormapped_im = (mapper.to_rgba(pred)[:, :, :3] * 255).astype(np.uint8)
im = pil.fromarray(colormapped_im)
raw_img = np.array(raw_img)
pred = np.array(im)
output = np.concatenate((raw_img, pred), axis=0)
output_sequences.append(output)
pred_out_file = os.path.join(rgb_path, file)
cv2.imwrite(pred_out_file, cv2.cvtColor(pred, cv2.COLOR_RGB2BGR))
width = int(output_sequences[0].shape[1] + 0.5)
height = int(output_sequences[0].shape[0] + 0.5)
fourcc = cv2.VideoWriter_fourcc(*'mp4v')
out = cv2.VideoWriter(
os.path.join(output_path, 'demo.mp4'), fourcc, 20.0, (width, height))
for frame in output_sequences:
frame = cv2.cvtColor(frame, cv2.COLOR_RGB2BGR)
out.write(frame)
# uncomment to display the frames
# cv2.imshow('demo', frame)
# if cv2.waitKey(25) & 0xFF == ord('q'):
# break
在退出之前释放网络摄像头
out.release()
# cv2.destroyAllWindows()
示例的结果视频
您可以从示例代码开始。
下载脚本运行演示
此示例命令将加载图像序列,然后存储一个视频
此示例命令将加载图像序列,然后存储相应的彩色视差序列
有关更多演示命令选项,请运行 python demo.py -h
提示
本教程直接将图像序列或视频加载到列表中,因此当图像序列或视频很大时无法工作。这里只是提供一个使用预训练的 monodepth2 模型为用户进行预测的示例。
脚本总运行时间: ( 0 分 56.825 秒)